Programming in C: Unit IV: Structures and Union
Singly Linked Lists
Programming in C
A singly linked list is the simplest type of linked list in which every node contains some data and a pointer to the next node of the same data type. By saying that the node contains a pointer to the next node we mean that the node stores the address of the next node in sequence.
SINGLY
LINKED LISTS
A
singly linked list is the simplest type of linked list in which every node
contains some data and a pointer to the next node of the same data type. By
saying that the node contains a pointer to the next node we mean that the node
stores the address of the next node in sequence. Figure 11.7 shows a singly
linked list.

A
singly linked list allows traversal of data only in one direction.
Traversing a Singly Linked List
Traversing
a linked list means accessing the nodes of the list in order to perform some
operations on them. Remember, a linked list always contains a pointer variable
START which stores the address of the first node of the list. The end of the
list is marked by storing NULL or -1 in the NEXT field of the last node. For
traversing the linked list, we also make use of another pointer variable PTR
which points to the node that is currently being accessed. The algorithm to
traverse a linked list is shown in Figure 11.8.

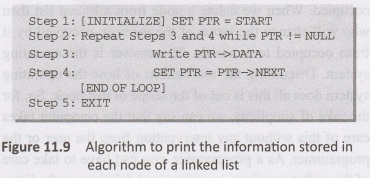
In
this algorithm, we first initialize PTR with the address of START. So now PTR
points to the first node of the linked list. Then in Step 2, a while loop is
executed which is repeated till PTR processes the last node, that is, until it
encounters NULL. In Step 3, we apply the process (e.g., print) to the current
node, i.e., the node pointed by PTR. In Step 4, we move to the next node by
making PTR point to the node whose address is stored in the NEXT field. The
algorithm to print the information stored in each node of the linked list is
shown in Figure 11.9.
Let
us now write an algorithm to count the number of nodes in the linked list. To
do this, we will traverse each and every node of the list and while traversing
every individual node, we will increment the counter by 1. Once we reach NULL,
that is, when all the nodes of the linked list have been traversed, the final
value of the counter will be displayed. Figure 11.10 shows the algorithm to
print the number of nodes in a linked list.

Searching for a Value in a Linked List
Searching
a linked list means to find a particular element in the linked list. As already
discussed, a linked list consists of nodes which are divided into two parts the
DATA part and the NEXT part, where DATA stores the relevant information and
NEXT stores the address of the next node in sequence. So obviously, searching
means finding whether a given value is present in the DATA part of the node or
not. If it is present, the search algorithm returns the address of the node
that contains that value. Figure 11.11 show the algorithm to search a linked
list.
In
Step 1, we initialize a pointer variable PTR with START. In Step 2, a while
loop is executed which will compare every node's DATA with VAL for which the
search is being made. If the search is successful, that is, VAL has been found,
then the address of that node is stored in POS and the control jumps to the
last statement of the algorithm. However, if the search is unsuccessful, POS is
set to NULL, which indicates that VAL is not present in the linked list.

Consider
the linked list shown in Figure 11.12. If we have VAL = 4, then the flow of the
algorithm can be explained as shown in this figure.

The
worst case of the search algorithm would occur when either VAL is not present
in the linked list or VAL is equal to DATA of the last node in the list. In the
best case, the first node's data has a value equal to VAL and in the average
case, the middle node's data has VAL stored in it.
Inserting a New Node in a Linked List
In
this section, we will see how a new node is added to an already existing linked
list. To illustrate this, we will take four cases and see how insertion is done
in each case.
Case 1
The new node is inserted at the beginning of a linked list
Case 2
The new node is inserted at the end of a linked list
Case 3
The new node is inserted after a given node
Case 4 The
new node is inserted before a given node
Before
we discuss the algorithms to perform insertion in all these four cases, let us
first discuss an important term—OVERFLOW. Overflow is a condition that occurs
when AVAIL = NULL or no free memory space is present in the system. This means
that we want to add data to the data structure, but there is no memory space
available to do so. When this condition prevails, the program must give an
appropriate message.
Case 1
Consider the linked list shown in Figure 11.13. Suppose we want to add a new node
with data 9 as the first node of the list. Then the following changes will be
done in the linked list.

Figure
11.14 shows the algorithm to insert a new node at the beginning of a linked
list. In Step 1, we first check whether memory is available for the new node.
If the free
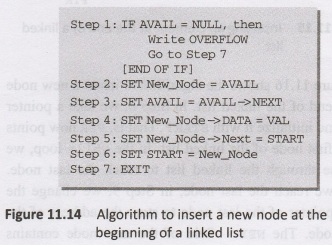
memory
has been exhausted then an OVERFLOW message is printed. Otherwise, if a free
memory cell is available then we allocate space for the new node. Its DATA part
is set with the given VAL and its NEXT part is initialized with the address of
the first node of the list, which is stored in START. Now, since the new node
is added as the first node of the list, it will now be known as the START node,
that is, the START pointer variable will now hold the address of the New node.
Note
the two steps:
Step 2: SET New_Node = AVAIL
Step 3: SET AVAIL = AVAIL->NEXT
These
steps allocate memory for the new node. In C, functions such as malloc(),
alloc(), and calloc() do this automatically on behalf of the user.
Case 2
Consider the linked list shown in Figure 11.15. Suppose we want to add a new
node with data 9 as the last node of the list. Then the following changes will
be done in the linked list.

Figure
11.16 shows the algorithm to insert a new node at the end of the linked list.
In Step 6, we take pointer PTR and initialize it with START. That is, PTR now
points to the first node of the linked list. In the while loop, we traverse
through the linked list to reach the last node. Once we reach the last node, in
Step 9, we change the NEXT pointer of the last node to store the address of the
new node. The NEXT field of the new node contains NULL which signifies the end
of the linked list.

Case 3
Consider the linked list shown in Figure 11.17. Suppose that we want to add a
new node with value 9 after

the
node containing data 3. Let us look at changes that will be done in the linked
list. The algorithm to add the new node is given in Figure 11.18. In Step 5, we
take a pointer PTR and initialize it with START. That is, PTR now points to the
first node of the linked list. Then we take another pointer variable PREPTR
which will be used to store the address of the node preceding PTR. Initially,
PREPTR is initialized to PTR. So now, PTR, PREPTR, and START all point to the
first node of the linked list.
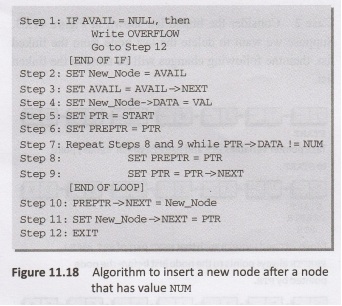
In
the while loop, we traverse through the linked list to reach the node that has
its value equal to NUM. We need to reach this node because the new node will be
inserted after this node. Once we reach this node, in Steps 10 and 11, we
change the NEXT pointers in such a way that a new node is inserted after the
desired node.
Case 4
Consider the linked list shown in Figure 11.19. Suppose that we want to add a
new node with value 9 before the node containing data 3. Let us discuss the
changes that will be done in the linked list.
Figure
11.20 shows the algorithm to insert a new node before a given node. In Step 5,
we take a pointer variable PTR and initialize it with START. That is, PTR now
points to the first node of the linked list. Then we take another pointer
variable PREPTR and initialize it with PTR. So now, PTR, PREPTR, and START all
point to the first node of the linked list.
In
the while loop, we traverse through the linked list to reach the node that has
its value equal to NUM. We need to reach this node because the new node will be
inserted before this node. Once we reach this node, in Steps 10 and 11, we
change the NEXT pointers in such a way that new node is inserted before the
desired node.


Deleting a Node
from a Linked List
In
this section we will see how a new node is deleted from an already existing
linked list. To illustrate this we will take three cases and see how the
deletion is done in each case.
Case 1
The first node is deleted
Case 2
The last node is deleted
Case 3
The node after the given node is deleted
Before
we begin with the algorithms to do the deletions in all these cases, let us
first discuss an important term- UNDERFLOW. Underflow is a condition that
occurs when we try to delete a node from a linked list that is empty. This
happens when START=NULL or when there are no more nodes to delete.
Note
When
we delete a node from the linked list, we have to free the memory occupied by
that node. The memory is returned back to the free pool so that it can be used
to store other data. Whatever be the case of deletion, we always change the
AVAIL pointer so that it points to the address which has been recently freed.
Case 1
Consider the linked list in Figure 11.21. When we want to delete a node from
the beginning of the list, then the following changes will be done in the
linked list.

Figure
11.22 shows the algorithm to delete the first node from the linked list. In
Step 1 of the algorithm, we check if the linked list exists. If START=NULL,
then it signifies that there are no nodes in the list and the control is
transferred to the last statement of the algorithm.
However,
if there are nodes in the linked list, then we use a pointer variable PTR that
is set to point to the first node of the list. For this, we initialize PTR with
START which stores the address of the first node of the list. In Step 3, START
is made to point to the next node in sequence and finally the memory occupied
by the node pointed by PTR (initially the first node of the list) is freed and
returned to the free pool.

Case 2
Consider the linked list shown in Figure 11.23. Suppose we want to delete the
last node from the linked list, then the following changes will be done in the
linked list.

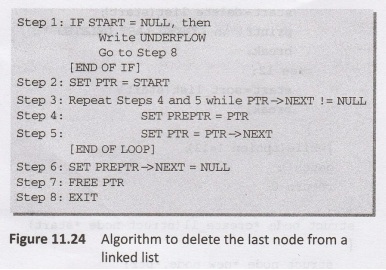
Figure
11.24 shows the algorithm to delete the last node from a linked list. In Step
2, we take a pointer variable PTR and initialize it to START. That is, PTR now
points to the first node of the linked list. In the while loop, we take another
pointer variable PREPTR such that it always points to one node before PTR. Once
we reach the last and the second last nodes, we set the NEXT pointer of the
second last node to NULL, so that it now becomes the (new) last node of the
linked list. The memory of the initial last node is freed and returned back to
the free pool.
Case 3
Consider the linked list shown in Figure 11.25. Suppose we want to delete the
node that succeeds the node which contains data value 4. Then the following
changes will be done in the linked list.
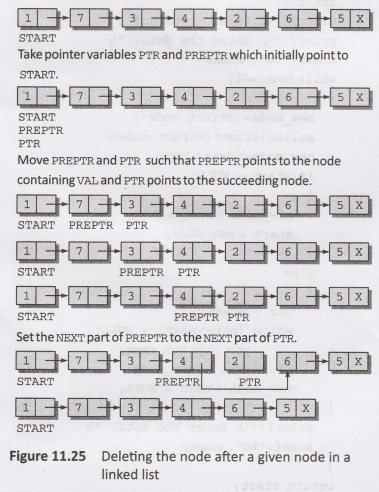
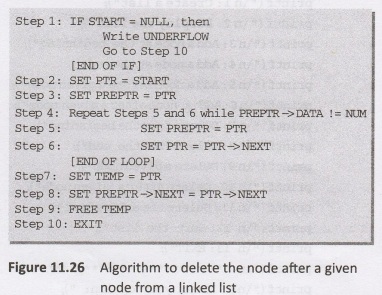
Figure
11.26 shows the algorithm to delete the node after a given node from the linked
list.
In Step 2, we take a pointer variable PTR and initialize it to START. That is, PTR now points to the first node of the linked list. In the while loop, we take another pointer variable PREPTR such that it always points to one node before PTR. Once we reach the node containing NUM and the node succeeding it, we set the NEXT pointer of the node containing NUM to the address contained in NEXT field of the node succeeding it. The memory of the node succeeding the given node is freed and returned back to the free pool.
Programming in C: Unit IV: Structures and Union : Tag: : Programming in C - Singly Linked Lists
Related Topics
Related Subjects

Programming in C
CS3251 2nd Semester CSE Dept 2021 | Regulation | 2nd Semester CSE Dept 2021 Regulation