Object Oriented Programming: Unit V: JAVAFX Event Handling, Controls and Components
JAVAFX Layouts
with Example Java Programs
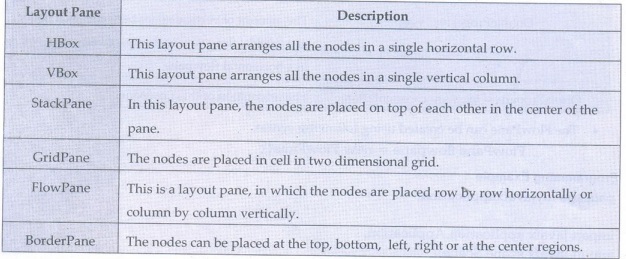
The arrangement of various components (nodes) in a scene within the container is called Layout of the container.For using the layout we must import the package javafx.scene.layout.
Layouts
• The
arrangement of various components (nodes) in a scene within the container is
called Layout of the container.
• For
using the layout we must import the package javafx.scene.layout. The class
named Pane is the base class for all the layouts in JavaFX.
• Various
layout panes are summarized in the following table.
For
adding the nodes to the layout manager follow the following step-
(1)
Instantiate the respective layout class. For example
VBox
root=new VBox();
(2) Then
set the properties of the layout.
For
example - if we want the spacing between the created nodes then we use
root.setSpacing(10);
(3)
Adding nodes to the layout object, for example -
root.getChildren().addAll(<NodeObjects>);
FlowPane
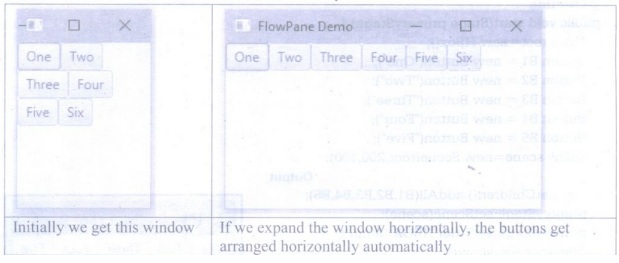
• A
JavaFX FlowPane is a layout component which lays out its child components
either vertically or horizontally, and which can wrap the components onto the
next row or column if there is not enough space in one row.
• The
JavaFX Flow Pane layout.FlowPane layout component is represented by the
javafx.scene.layout.FlowPane
• Various
methods defined in FlowPane layout are --

• The
FlowPane can be created using following syntax
FlowPane
flowpane = new FlowPane();
Programming Example
package
myjavafxapplication;
import
javafx.application.Application;
import
javafx.scene.Scene;
import
javafx.scene.control.Button;
import
javafx.scene.layout.FlowPane;
import
javafx.stage.Stage;
public
class MyJavaFXApplication extends Application {
@Override
public
void start(Stage primaryStage) {
FlowPane
root=new FlowPane();
Button
B1 = new Button("One");
Button
B2 = new Button("Two");
Button
B3 = new Button("Three");
Button
B4 = new Button("Four");
Button
B5 = new Button("Five");
Button
B6 = new Button("Six");
root.getChildren().add(B1);
root.getChildren().add(B2);
root.getChildren().add(B3);
root.getChildren().add(B4);
root.getChildren().add(B5);
root.getChildren().add(B6);
Scene
scene = new Scene(root, 150, 150);
primaryStage.setScene(scene);
primaryStage.setTitle("FlowPane
Demo");
primaryStage.show();
public
static void main(String[] args) {
launch(args);
}
}
HBox
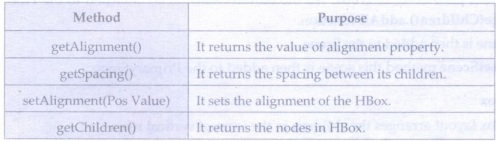
• The
HBox layout arranges the children in the form of horizontal rows.
• The
HBox class extends Pane class.
• It
requires javafx.scene.layout.HBox class which provides all the required methods
of this pane.
• Various
methods used for layout using HBox are -
The
constructors of HBox class are -
HBox():
Creates an HBox object with no nodes.
HBox(double
s): Creates an HBox with spacing in between nodes.
Programming Example
package
myjavafxapplication;
import
javafx.application. Application;
import
javafx.scene.Scene;
import
javafx.scene.control.Button;
import javafx.scene.layout.HBox;
import
javafx.stage.Stage;
public
class MyJavaFXApplication extends Application {
@Override
public
void start(Stage primaryStage) {
HBox
root=new HBox();
Button
B1 = new Button("One");
Button
B2 = new Button("Two");
Button
B3 = new Button("Three")
Button B4 = new Button("Four");
Button B5 = new Button("Five");
Scene
scene = new Scene(root,200,100);
Output
root.getChildren().addAll(B1,B2,
B3, B4, B5);
primaryStage.setScene(scene);
primaryStage.setTitle("HBOX
Demo");
primaryStage.show();
}
public
static void main(String[] args) {
launch(args);
}
}
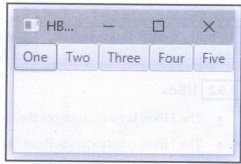
Program Explanation: In above code,
(1) We
have created four button elements.
(2) The
layout pane is set as HBox. All the button elements are attached to the HBox
pane by using getChildren().addAll function.
(3) This
pane is then added to the Scene.
(4)
Using setScene method this scene is then added to the PrimaryStage.
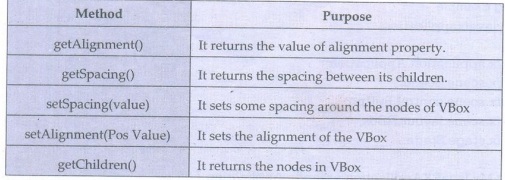
VBox
• The
VBox layout arranges the children in the form of vertical rows.
• The
VBox class extends Pane class.
• It
requires javafx.scene.layout.VBox class which provides all the required methods
of this pane.
• Various
methods used for layout using VBox are -
• The
constructors of VBox class are -
VBox():
Creates an VBox object with no nodes.
VBox(double
s): Creates an VBox with spacing in between nodes.
Programming Example
package
myjavafxapplication;
import
javafx.application.Application;
import
javafx.scene.Scene;
import
javafx.scene.control.Button;
import
javafx.scene.layout.VBox;
import
javafx.stage.Stage;
public
class MyJavaFXApplication extends Application {
@Override
public
void start (Stage primaryStage) {
VBox
root=new VBox();
Button
B1 = new Button("One");
Button
B2 = new Button("Two");
Button
B3 = new Button("Three");
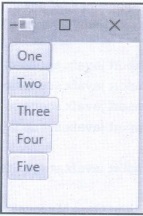
Output
Button
B4 = new Button("Four");
Button
B5 = new Button("Five");
Scene
scene = new Scene(root, 100,150);
root.getChildren().addAll(B1,B2,
B3, B4, B5);
primaryStage.setScene(scene);
primaryStage.setTitle("VBOX
Demo");
primaryStage.show();
}
public
static void main(String[] args) {
launch(args);
}
}
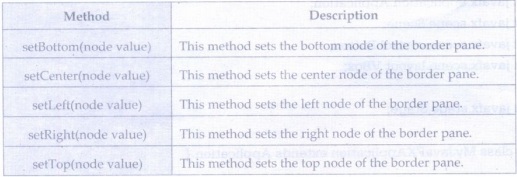
BorderPane
• BorderPane lays out children in top, left,
right, bottom, and center positions.
• It can
be used to create the classic looking application layouts.
• It is
represented by javafx.scene.layout.BorderPane class.
• Various
methods of BorderPane layout are
• The
BorderPane layout is created as follows-
(1)
BorderPane(): Creates a new Border Pane.
(2)
BorderPane (Node c): Creates a new Border Pane with specified node at center.
(3)
BorderPane (Node center, Node top, Node right, Node bottom, Node left): Creates
an BorderPane layout with the given Nodes to use for each of the main layout
areas of the Border Pane.
Programing Example
package
myjavafxapplication;
import javafx.application.
Application;
import
javafx.scene.Scene;
import
javafx.scene.control.Button;
import
javafx.scene.layout.BorderPane;
import
javafx.stage.Stage;
public
class MyJavaFXApplication extends Application
{
@Override
public
void start (Stage primaryStage)
{
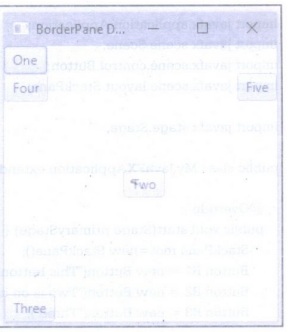
Button'B_top
= new Button("One");
Button B
center = new Button("Two");
Button
B_bottom= new Button("Three");
Button
B_left = new Button("Four");
Output
Button
B_right = new Button("Five");
BorderPane
root = new BorderPane();
root.setTop(B_top);
root.setCenter(B_center);
root.setBottom
(B_bottom);
root.setLeft(B_left);
root.setRight
(B_right);
Scene
scene = new Scene(root,250,250);
primaryStage.setScene(scene);
primaryStage.setTitle("Border
Pane Demo");
primaryStage.show();
}
public
static void main(String[] args) {
launch(args);
}
}
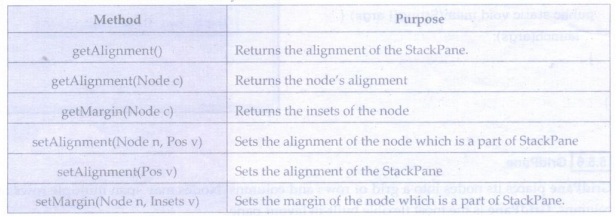
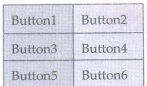
StackPane
• StackPane
is a layout in which every new node is placed on the top of previous node.
• It
makes use of javafx.scene.layout.StackPane class.
• Various
methods of StackPane layout are -
• The
constructor for StackPane layout is
1.
StackPane()
2.
StackPane (Node... Children)
Programming Example
package
myjavafxapplication;
import
javafx.application. Application;
import
javafx.scene.Scene;
import
javafx.scene.control.Button;
import
javafx.scene.layout.StackPane;
import
javafx.stage.Stage;
public
class MyJavaFXApplication extends Application {
@Override
public
void start(Stage primaryStage) {
StackPane
root=new StackPane();
Button
B1 = new Button("This button is with caption One");
Button
B2 = new Button("Two is on its top");
Button
B3 = new Button("Three");
Scene
scene=new Scene(root,100,150);
Output
root.getChildren().addAll(B1,B2,B3);
primaryStage.setScene(scene);
primaryStage.setTitle("StackPane
Demo");
primaryStage.show();
}
public
static void main(String[] args) {
launch(args);
}
}
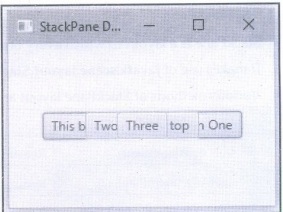
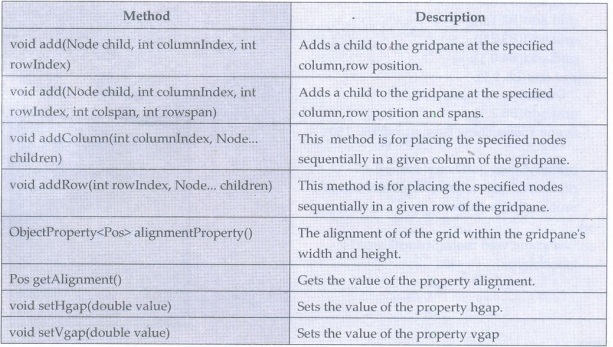
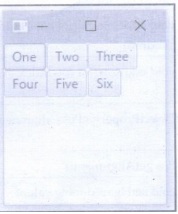
GridPane
GridPane
places its nodes into a grid of rows and columns. Nodes may span multiple rows
or columns. GridPane is the most flexible built-in layout pane.
The
GridPane is given by
Various
methods used in GridPane are -
GridPane
gridPane = new GridPane();
Following
example shows the use of GridPane layout
Programming Example
package
myjavafxapplication;
import
javafx.application.Application;
import
javafx.scene.Scene;
import
javafx.scene.control.Button;
import
javafx.scene.layout.GridPane;
import
javafx.stage.Stage;
public
class MyJavaFXApplication extends Application {
@Override
public
void start(Stage primaryStage) {
GridPane
grid=new GridPane();
Button
B1 = new Button("One");
Button
B2 = new Button("Two");
Button
B3 = new Button("Three");
Button
B4 = new Button("Four");
Button
B5 = new Button("Five");
Button
B6 = new Button("Six");
grid.add(B1,0,0);
grid.add(B2,1,0);
grid.add(B3,2,0);
grid.add(B4,0,1);
grid.add(B5,1,1);
Output
grid.add(B6,2,1);
Scene
scene=new Scene(grid, 150, 150);
primaryStage.setScene(scene);
primaryStage.setTitle("GridPane
Demo");
primaryStage.show();
}
public
static void main(String[] args) {
launch(args);
}
}
Object Oriented Programming: Unit V: JAVAFX Event Handling, Controls and Components : Tag: : with Example Java Programs - JAVAFX Layouts
Related Topics
Related Subjects
Object Oriented Programming
CS3391 3rd Semester CSE Dept | 2021 Regulation | 3rd Semester CSE Dept 2021 Regulation