Object Oriented Programming: Unit V: JAVAFX Event Handling, Controls and Components
Basicas of JAVAFX
Features, Major Components, Important Methods, Property Binding, Example Java Programs
JavaFX was originally developed by Chris Oliver, when he was working for a company named See Beyond Technology Corporation, which was later acquired by Sun Microsystems in the year 2005.
UNIT V : JavaFX Event Handling, Controls and Components
Basicas of JAVAFX
• JavaFX was originally developed by Chris Oliver, when he was working for a company named See Beyond Technology Corporation, which was later acquired by Sun Microsystems in the year 2005.
• JavaFX is a set of graphics and media packages that enables developers to design, create, test, debug, and deploy rich client applications that operate consistently across different platforms.
• JavaFX makes it easier to create desktop applications and
Games in Java.
• JavaFX has replaced Swing as the recommended GUI toolkit for Java. Furthermore, JavaFX is more consistent in its design than Swing, and has more features.
Features of JAVAFX
1) JavaFX library is written in java. Hence developer find it easy to learn and write the applications in JAVAFX.
2) JAVAFX library creates UI controls using which any GUI based application can be developed.
3) It provides the classes for 2D and 3D graphics.
4) JavaFX contains a set of ready-to-use chart components, so you don't have to code that from scratch every time you need a basic chart.
5) JavaFX components can be styled using CSS.
6) It provides the support for integrating audio, videos, and web applications.
We need to import javafx.application.Application class in every JavaFX application.
Every JAVAFX program is divided into three main components - Stage, Scene and Node and Scene graph.

(1) Stage; Stage is like main frame of the program. It acts as a container for all the objects of JavaFX application. The most commonly used stage is a PrimaryStage. It is created internally by the platform. The object of PrimaryStage is passed to the start() method. There is a show method that is used to show the stage.
(2) Scene: The Javafx.scene.Scene class provides the methods to deal with the scene object. It contains the nodes or all the contents of Scene graph. The scene is created by instantiating the Scene class.
(3) Scene Graph and Node: The scene graph is a collection of various nodes. The node is an element that can be visualized on the screen. The node can be button, textbox, radio button and so on.
The nodes are implemented in tree like manner. There is one root node. This will be the parent node of all the other nodes.
Important Methods used in JavaFX Application
(1) start(): This is the method in which we write the code for JavaFX application. The construct for this method is
public abstract void start(Stage primaryStage)
(2) launch() In the main method, you have to launch the application using the launch() method. This method internally calls the start() method of the Application class. Since the launch() method is static, you need to call it from a static method such as main()
Writing First JavaFX Application Program
We can create an application program in NetBean IDE or Eclipse IDE. Following steps are used to create this application program -
Prerequisite: Before executing the JavaFX application program, you need to have following things installed in your PC
i) Java 8
ii) NetBeans 8
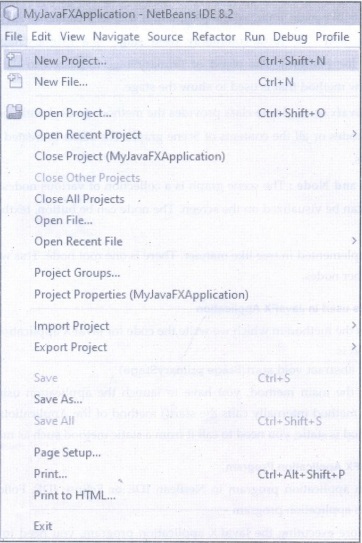
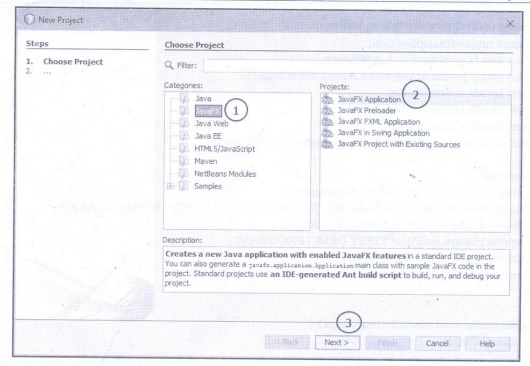
Step 1: From the File menu, choose New Project. Then select JavaFX application category, choose JavaFX Application. Click Next.
Then the code can be written as follows
package myjavafxapplication;
import javafx.application.Application;
import static javafx.application. Application.launch;
import javafx.scene.Scene;
import javafx.scene.control.Label;
import javafx.stage.Stage;
public class MyJavaFXApplication extends Application {
@Override
public void start (Stage primaryStage) {
Label L= new Label(" WELCOME TO FIRST APPLICATION USING JAVAFX");
Scene scene = new Scene(L, 300, 300);
primaryStage.setTitle("FIRST DEMO PROGRAM");
primaryStage.setScene(scene);
primaryStage.show();
}
public static void main(String[] args) {
launch(args);
}
}
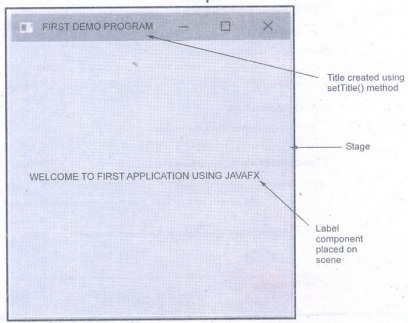
Step 2: Now right click on the source file and click on Run File As. The output will be displayed as follows
Output
Program Explanation: In above program,
1. We have to import javafx.application.Application package to support the Application class.
2. Then we need to import the classes for supporting - Stage Scene, Label component and launch method. Hence we add following lines in our code.
import static javafx.application. Application.launch;
import javafx.scene.Scene;
import javafx.scene.control.Label;
import javafx.stage.Stage;
3. Our class must extend Application class.
4. Then we write overridden start() method in which the entire application code is written. The primaryStage is passed as a framework to this start method as a parameter. Note that these are all standard steps for any JavaFX application program.
5. Then we have -
Step 1: Created a Label component.
Label L=new Label(" WELCOME TO FIRST APPLICATION USING JAVAFX"); Step 2: Created a Scene using new operator and placed the Label component on Scene. Scene scene = new Scene(L, 300, 300);
Step 3: Using setScene method we have set this scene for Stage
primaryStage.setScene(scene);
Step 4: If you want to display the title for your application page, then it is possible by using setTitle method for the Stage component. Keep it in mind that here stage is something like a frame on which scene, UI components are placed.
primaryStage.setTitle("FIRST DEMO PROGRAM");
Step 5: Finally any component can be made visible by using show() method.
primaryStage.show();
6. Then write the main() method which in turn will call launch() method to call your start() method.
public static void main(String[] args) {
launch(args);
}
That's it. Now run your application program and a Label component with some message will be displayed as an output.
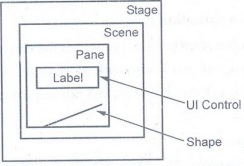
Panes and UI Controls
• Pane is a container class using which the UI components can be placed at any desired location with any desired size.
• Generally you place a node inside a pane and then place pane into a scene. Actually node is any visual component such as UI controls, shapes, or a image view.
• UI Controls refer to label, button, Checkbox, radio buttons and so on.
• Shapes refer to lines, rectangle, circle and so on.
• A Scene can be displayed in a Stage. The relationship between node, Pane, Scene, Stage is shown by following figure.
• Programming Example
package myjavafxapplication;
import javafx.application.Application;
import javafx.scene.Scene;
import javafx.scene.control.Button;
import javafx.scene.layout.StackPane;
import javafx.stage.Stage;
public class MyJavaFXApplication extends Application {
@Override
public void start (Stage primaryStage) {
Button btn = new Button("Click Me");
StackPane root = new StackPane();
root.getChildren().add(btn);
Scene scene = new Scene(root, 300, 250);
primaryStage.setTitle("Demo Program");
primaryStage.setScene(scene);
primaryStage.show();
}
public static void main(String[] args) {
launch(args);
}
}
Output

Program Explanation: In above program,
1) We have created a Pane named StackPane, and added a button component as a child of the pane. For that purpose we use getChildren() method.
2) The StackPane places the nodes in t he center of the pane on top of each other. Here, there is only one node in the pane. The use of Pane allows the button component to be displayed with its preferred size.
Property Binding
• JavaFX introduces a new concept called binding property that enables a target object to be bound to a source object.
• If the value in the source object changes, the target property is also changed automatically.
• The target object is simply called a binding object or a binding property.
• A target listens to the changes in the source and automatically updates itself once a change is made in the source. A target binds with a source using the bind method as follows:
target.bind(source);
• The bind method is defined in the javafx.beans.property.Property interface.
• A binding property (target) is an instance of javafx.beans.property.Property.
• A source object is an instance of the javafx.beans.value.ObservableValue interface.
• For example -
//create a property with value=10
SimpleIntegerProperty num1 = new SimpleIntegerProperty(10);
//create another property
SimpleIntegerProperty num2=new SimpleIntegerProperty();
public void test()
{
System.out.println(num2.get());// '0'
num2.bind(num1); //bind num2's property to num1
System.out.println(num2.get());// 10
num1.set(20); //set num1 property's value
System.out.println(num2.get());// '20' - the value was automatically updated
}
• JavaFX defines binding properties for primitive types. For a double/float/ long/int/Boolean value, its binding property type is
DoubleProperty/FloatProperty/Long Property/Integer Property/Boolean Property
• Similarly the binding property for string can be defined as StringProperty.
• It is possible to create bidirectional bindings. In this case, properties depend on each other.
• A unidirectional binding binds a target with a source. A bidirectional binding binds two objects together. Changes in one object affects the other. The above given example is an example of unidirectional binding.
• Example of Bidirectional Binding
import javafx.beans.property.DoubleProperty;
import javafx.beans.property.SimpleDoubleProperty;
public class test {
public static void main(String[] args) {
DoubleProperty num1 = new SimpleDoubleProperty(10);
DoubleProperty num2 = new SimpleDoubleProperty(20);
num1.bind(num2);
System.out.println("Num1 = +num1.getValue()); //Outputs 20
System.out.println("Num2 +num2.getValue()); //Outputs 20
num2.setValue(555);
System.out.println("Num1= +num1.getValue()); //Outputs 555
System.out.println("Num2 = +num2.getValue()); //Outputs 555
}
}
Review Questions
1. What is property binding concept?
2. Explain the basic structure of JavaFX program with suitable example.
3.What are the important methods used in JavaFX application?
4.Explain the concept of Panes, UI control and shapes.
Object Oriented Programming: Unit V: JAVAFX Event Handling, Controls and Components : Tag: : Features, Major Components, Important Methods, Property Binding, Example Java Programs - Basicas of JAVAFX
Related Topics
Related Subjects
Object Oriented Programming
CS3391 3rd Semester CSE Dept | 2021 Regulation | 3rd Semester CSE Dept 2021 Regulation